Saturday, March 30, 2013

chicken noodle soup

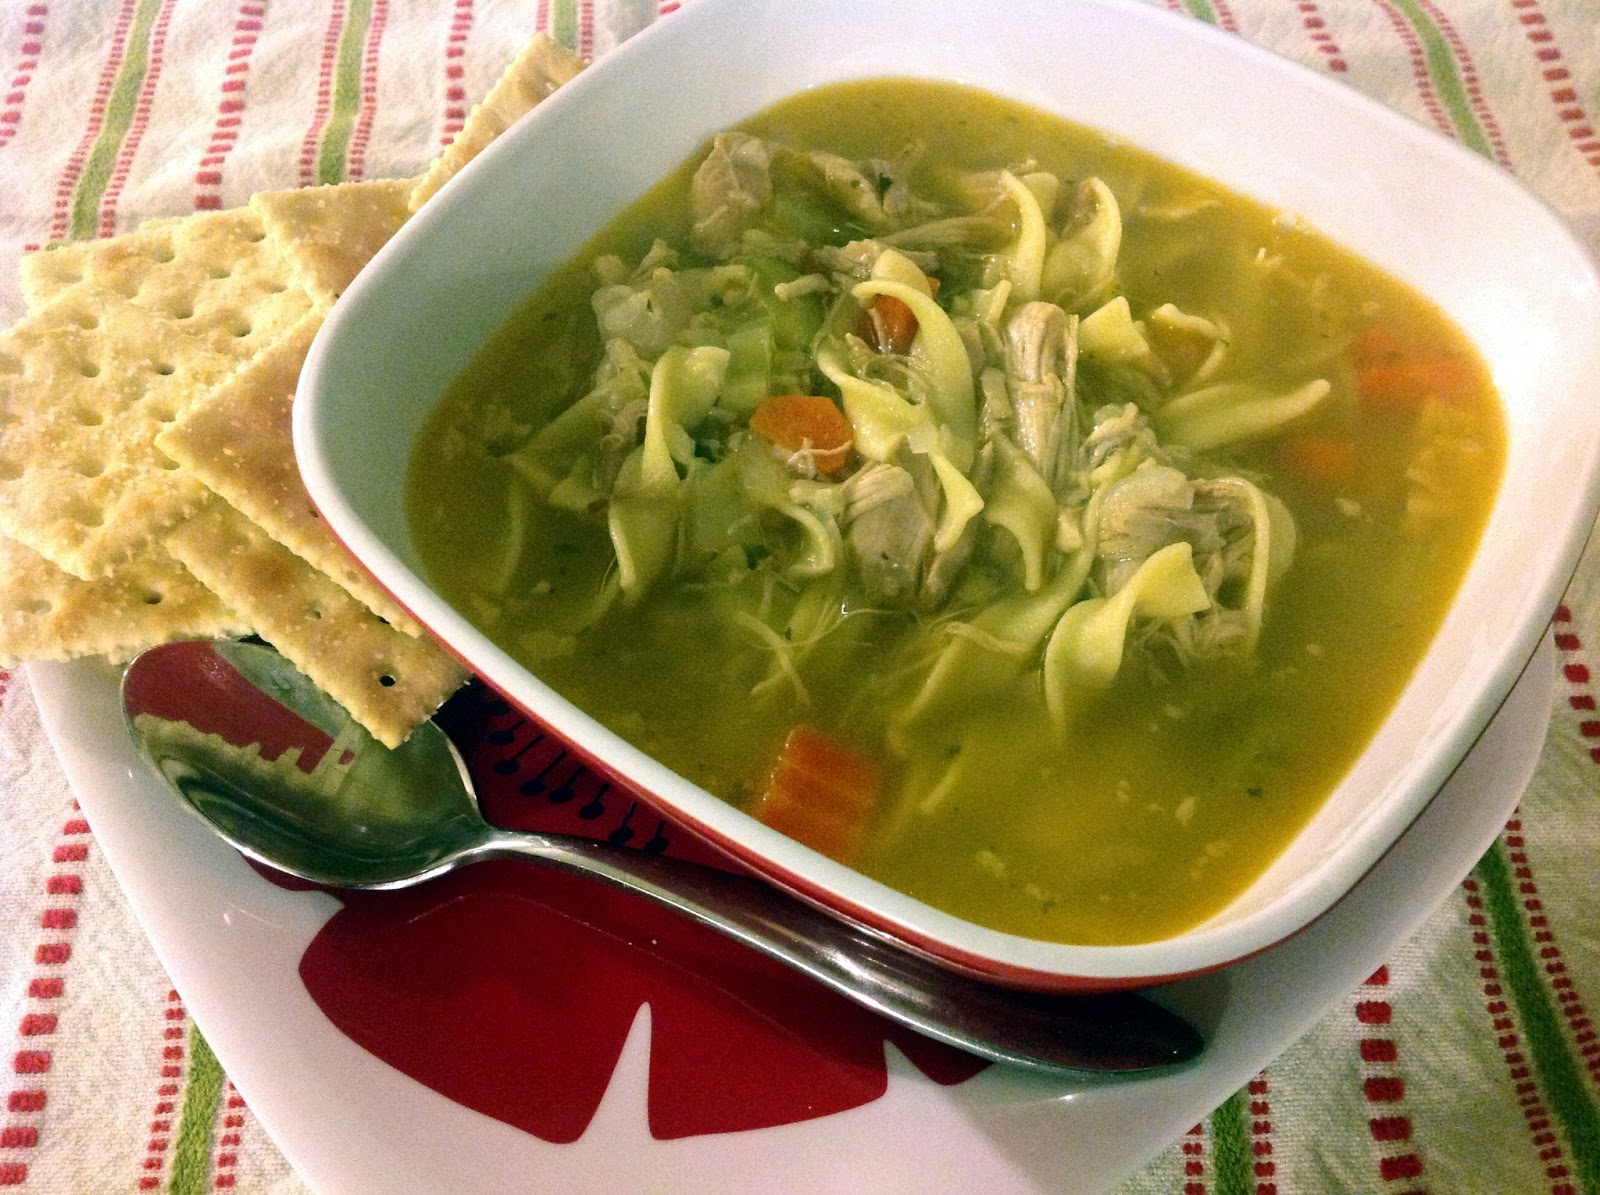
Ed has been sick this entire past week, which has not been fun for either of us. When Ed gets sick, he"s just like a little kid. He asked me for a milkshake and soup. Well, we went to McDonald's for the milkshake, and I took care of the soup.
The basis of any good soup is good stock, which then becomes good broth. I like to make mine from scratch because it's just better. Everything takes like what you put into the soup. In the case of this basic chicken noodle, I eventually would serve it with chicken, onion, celery and carrot, so I use celery, onion and carrot for the stock.
After the stock has been simmering for about 30 minutes, I add the chicken thighs. I prefer the dark meat because it stays juicer, and because it usually comes bone it. You can always use chicken breast if you would like, though.
I simmer everything together for about an hour, or more. After this, you have a delicious base for your chicken noodle soup. Remove the stock ingredients and allow them to cool.
After the chicken has cooled, pick it apart and get all the meat. I use different diced carrot, celery and onion when I make my final soup, so I dice them, add them to the stock and add various spices like salt, paprika and celery seed and continue to cook for an additional 30 minutes.
After I've thrown in the chicken for the second time, I also add garlic that's been minced so that the garlic flavor is subtle, and not over powering. After this has boiled for about 15 minutes, I add the noodles.
I always, always, always use eggs noodles in the chicken noodle soup because the have the best texture in the stock, for me at least. Use whatever noodle you would like, but nothing too thick. At this point, the only thing that has left to happen is the noodles need to boil until al dente- about 8-10 minutes. This is sure to help cure anything that ails you!


Chicken Noodle Soup
3 lbs skinless chicken thighs
1 large onion
6 carrots, peeled
4 ribs of celery
10 cups water
3 cloves garlic, minced
1/2 teaspoon paprika
1/2 teaspoon onion powder
1/4 teaspoon celery seed
1/4 teaspoon garlic powder
Salt and Pepper to taste
2 hand fulls medium egg noodles

In a large stock pot, combine 10 cups of water, 1/2 of a large onion, 3 carrots that have been peeled and 2 ribs of celery (including tops). Boil for 30 minutes and then add chicken thighs. Boil this for an additional 30 minutes. Remove everything from liquid using a slotted spoon and allow to cool. Meanwhile, dice 3 carrots, the remaining onion and celery and add it to the stock. When chicken is cool, pick the meat from the bone and add it back into the stock along with the minced garlic and spices. Cook this for an additional 30 minutes. Add noodles and cook until they are al dente. Serve hot, along side crackers. Enjoy!

Friday, March 29, 2013

perfect pomme puree (a.k.a. french mashed potatoes)

Joel Robuchon, the famous French chef, says to make perfect mashed potatoes, you need almost equal parts  potatoes and butter/ milk. And not just any milk, whole milk or half and half. In France, this delicious, fluffy mush is known as pomme puree.
It's important to choose a potato that is firm and can handle being beaten to within an inch of it's life. Russet potatoes are really great and they are readily available.
Because there are just 2 of us, I only use 4 potatoes. 2 for each and enough for leftovers the next day. I usually leave the skins on when I make mashers, but for these perfect mashed potatoes, skins off!
This next tip holds up for pomme puree as well as any variety of mashed potato- start the potatoes in cold water and boil from there. If you start with cold water and bring everything up to temperature together, everything will cook evenly. It's also important to make sure that all the chunks of potato are relatively the same size.
Next tip! Make sure potatoes are completely dry before starting to mash. Nothing makes for a icky-ier mash than diluting it with water. I just toss mine back into the stock pot and use the residual heat to steam it off.
Okay, next tip. Use real butter. Yes, real butter, not margarine. I use a full stick and 1/2 for just 2 potatoes and make sure that it's room temperature and softened. As for the milk, 3/4 of a cup of whole milk that's been heated in a sauce pan almost to boiling. That way you aren't adding cold milk and cold butter to warm potatoes. I add a considerable amount of salt, but it's up to you how much you add. Salt to taste.
Time for a beating. I use a hand mixer because that's the only way to make sure that they are really, really mashed. You can use a hand masher, but unless you want to use every ounce of your arm strength to get the lumps out, I'd just use the mixer. No lumps, no bumps. This needs to be silky smooth. Serve hot. Seriously hot. I don't recommend eating this every day, you know, because of the butter, but it's definetly a tasty treat.
Perfect Pomme Puree (a.k.a. French Mashed Potatoes)
2 lbs russet potatoes, peeled and cut into cubed
1 1/2 stick butter, room temperature
3/4 cup whole milk
Salt to taste

Place cubed potatoes in cold water and bring to a boil together over medium high heat. Boil until potatoes are fork tender. Meanwhile, heat whole milk in a small sauce pan until just boiling. Drain and transfer back into hot stock pot. Dry of any residual moisture with the heat of the stock pot. Add warm milk, softened butter and salt to dry, cooked potatoes and mash until completely smooth using a hand mixer. Serve immediately. Enjoy!

Thursday, March 28, 2013

baked corn

This is a legend in our home. Not just Ed and I's home, but the Black Family home. It's a recipe that's been passed down on my father's side of the family and is beloved by all. I usually make mine while whole kernel corn rather than creamed corn, but for the sake of this post, I went old school.
This is the original recipe above, and the one that I use. This cook book contains the recipes that my family uses on a regular basis and the ones that I really wanted when I moved out on my own.
I do use less sugar than what's in the original recipe because I think creamed corn is already really sweet, but that all depends on how sweet you like it.
It's important to coat the pan with butter and to top with butter. Margarine will work as well (if you're into that sort of thing) but don't use cooking spray. It makes it kind of... funny. The texture goes all wonky if you spray the bottom.
As you can see, this turns into almost a corn souffle. And it's delicious. Creamy and buttery, and if you use whole kernel corn instead of creamed corn, it's almost like a corn quiche. Delicious.
Baked Corn
1 can yellow crushed corn or whole kernel corn
2 eggs
2 Tablespoons flour
2 Tablespoons sugar
1/4 teaspoon salt
1 cup milk
2 Tablespoons butter

Preheat oven to 350 degrees. Beat eggs and combine with flour, sugar and salt. Mix until smooth. Stir in milk and corn. Pour corn mixture into a buttered casserole dish. Top with pats of butter. Bake in oven for 30 minutes. Stir and continue baking for an additional 20-30 minutes, or until top is brown and toasty and corn mixture is set.  Enjoy!

Tuesday, March 26, 2013

pork ribs a-la cindy

This recipe has been in my family for a while, and they call them pork chops a-la Cindy, named after my Aunt Cindy. I changed the recipe a little bit, but below is the original.
The below is the beer I decided to use. But you can use whatever you want!
I add a few things, and instead of using pork chops, I opted to what they call picnic ribs- thicker and meatier than regular ribs. I also cook mine in the crock pot for 6 hours so they are beyond tender and require less maintenance.
Additional ingredients include liquid smoke, crushed red pepper and garlic. I also use honey instead of brown sugar.
Toss them around to coat and cook on low for 6 hours.
After the six hours are up, drain off several tablespoons of the liquid and mix with cornstarch.
Whisk together and add to the crock pot. Allow to cook for another 30 minutes to thicken.
Ah yea! This makes it more barba-quey than before!
Pork A-La Cindy
2 lbs of pork, ribs or chops
2/3 cup beer
2/3 cup ketchup
2 Tablespoons honey
1 teaspoon minced garlic
1 teaspoon crushed red pepper flake
4-5 drops liquid smoke
3 Tablespoons corn starch

Mix together all ingredients except pork in the crock pot. Drop in pork and mix to coat. Cook in crock pot for 6 hours. Remove 1/3 cup liquid and combine with 3 Tablespoons of corn starch. Mix into crock pot and allow to cook for another 1/2 hour to thicken. Serve immediately and enjoy!

Monday, March 25, 2013

fluff and tuff dog toys

These are Fluff and Tuff dog toys, a sturdy and plush puppy toy that's one of our favorites! We first purchased the elephant back in 2011, and it's managed to remain unscathed (for the most part) for almost a full 2 years! Any plush dog toy that can survive that long in our house is definetly a keeper. We actually have 4 other kinds, but these ones were sitting right on the top of the basket of dog toys.
All in all, we have the snake, elephant, baby frog, adult frog, tiger ball, squirrel, duck, baby gator and chipmunk and all have survived since we first purchased them. That's not to say they are in factory condition, but apart from minor tears and holes, they are basically intact.
I have had the pleasure of meeting the owners of the company, Ellen and Chris Lawson, and they are super sweet- which makes you feel even better about buying the toys! Each piece is designed with their own 3 dogs in mind! Not only that, but for each toy they sell, they donate $.50 to Leader Dogs for the Blind!
These toys are durable- more durable than almost any other toy I've given to the dogs. Definetly the most durable plush toy they've ever had! Each toy features:
-Ultra plush outer fabric
-Thick inner mesh liner
-Double stitched seams
-Stitched (not plastic) eyes
-No hard edges
Now, these toys aren't super cheap. But believe me, they are worth it! $20.00 for a toy that'll last 2 years like our elephant has is worth it. Especially since you can spend $5.00 on a toy and it'll last less than an hour before the stuffing is all over the place. They've recently come out with an extra large sized Bear that retails for almost $30; still cheaper than most "durable" labeled plush toys.

You can buy Fluff and Tuff dog toys here, and check out their website for a list of local vendors!

Saturday, March 23, 2013

mayan beef skillet

I've been on a rice kick. Definetly. I think Ed is tired of it. Sorry for him, I have at least 2 more meals planned for the next week that involve rice. I've also been on an ethnic meal kick, as well. Sweet and Sour Chicken, Beef and Broccoli, Paella, and I have others planned.
This is a habanero pepper. Super spicy. The original recipe called for using either 1 or 2, so I opted for 1 because I feared it would be too spicy. Next time, I think I'll use 2. Just remember to wash your hands thoroughly after slicing and mincing.
I cheat and usually buy beef already in strips. I'm lazy. But, you can use flank or strip steak and cut it into strips. If you're feeling ambitious.
After you cook the beef and put it off to the side, don't dump out the excess cooked broth. I just add the oil right to it- that's what you see all crispy in the onions there. I rather like the flavor of the cooked beef broth among the onions.
This is not a recipe for people who don't like tomatoes- like Ed. I've been trying to reform him, however, so I feed him tomatoes. I think they're quite delicious. And he ate most of them.
Mayan Beef Skillet
Original recipe found in Latin Flavor from the Pampered Chef.
1 small onion
1-2 habanero peppers
2 tablespoons chopped fresh cilantro
1 lb boneless beef sirloin steak
3 Tablespoons olive oil
1 Tablespoon cumin
1 Tablespoon Adobe seasoning
2 garlic cloves, minced
1 28 oz. can diced tomatoes
1/2 teaspoon salt
3 cups hot cooked white rice

Chop onion and habanero together. Toss steak strips in 2 tablespoons of oil and seasonings and then cook in a skillet over medium heat until cooked through. Remove from skillet and keep warm. Add remaining oil to skillet and saute onions, garlic and habanero until soft and fragrant. Add diced tomato and cook for 5 minutes so flavors incorporate. Stir in steak, cilantro and additional salt. Serve steak mixture over hot rice. Enjoy!

Thursday, March 21, 2013

sweet and sour chicken

I have been in a Chinese food mood lately. I got beef fried rice from my favorite place yesterday, and in the last week I made both beef and broccoli and sweet and sour chicken. While Ed didn't like the beef and broccoli much, he LOVED the sweet and sour chicken. His response to this meal was "I love your blog."

Usually I tell people that you can use either flour or cornstarch for thickening, but you HAVE to use cornstarch for this. It's the binder that gives this meal it's crispiness, as well as it let's the sauce really stick to the chicken.
I didn't get a shot of the chicken in oil getting it's crispy outside, but you don't need to cook the chicken completely through- you're just trying to get a nice crunch.
While the chicken is in the pan, mix up the saucy magic. As usual, mason jars make an excellent mixing containers.
Pour the saucy magic over the chicken and pop in the oven! Be sure to toss and stir this in the oven every 15 minutes during the cook time in the oven so the sugars don't burn too much.
Oh yea. That's the stuff.
Sweet and Sour Chicken
Original recipe can be found at Joyously Domestic!
1 lb. boneless skinless chicken breast
1/2 cup corn starch
Salt and Pepper
2 eggs, beaten
1/2 cup vegetable oil
3/4 cup sugar
4 tablespoons ketchup
1/2 cup distilled white vinegar
1 Tablespoon low sodium soy sauce
1 teaspoon garlic salt
1/2 teaspoon red pepper flake
Sesame seeds

Preheat oil in a sauce pan over medium heat and preheat oven to 325 degrees. Cut chicken into 1 inch chunks. Place corn starch, salt and pepper and diced chicken into a 1 gallon plastic ziplop bag and shake to toss. Using a slotted spoon, shake of excess cornstarch and place chicken in a shallow baking dish. Coat chicken in beaten eggs and toss to coat. Cook chicken in the oil for 2-3 minutes on either side. While chicken is cooking, mix together sugar, ketchup, vinegar, soy sauce, garlic salt and red pepper flake. Using a slotted spoon, transfer fried chicken into a greased baking dish. Coat chicken with 3/4 of sauce mixture. Cook in oven for 45 minutes, stirring ever 15 minutes. Pour excess sauce onto chicken when done. Serve over hot white rice. Enjoy!